Sometimes you can reglue
A Finish Flake
© Frank Ford, 2/12/99; Photos by FF, 1999
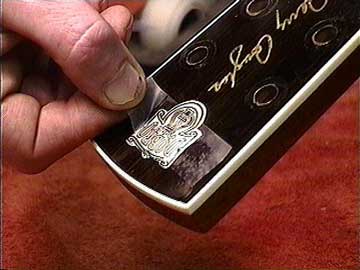
Here's an unusual situation. This Dobro logo was silkscreened over a blank mother
of pearl inlay. Then clear lacquer was applied over the peghead, sealing the printed
logo underneath. Unfortunately, the lacquer simply didn't stick to the pearl inlay.
About two years after the instrument was made, the finish fell off in a great big
flake, leaving a portion behind, but not attached, like a blister:

The loose lacquer was only about .006" thick, and was quite fragile. It was
also brittle and curly, so it wouldn't lay flat on the peghead.
The lacquer might have adhered better to the pearl if the factory had used a shellac
undercoat, or had left the pearl roughened rather that polished. Shellac and some
other sealers actually stick better than lacquer on nonporous surfaces.
I figured I had only one chance to save this flake of finish and
its printed design.
I carefully laid it back in position, and taped it down with clear plastic tape:

The tape didn't cover the entire damaged area, so I was able to run some thin viscosity
cyanoacrylate under the flakes:

A quick blot with a paper towel helped keep the mess to a minimum:

Then, clamping with a thick flat acrylic caul and waxed paper, I could see the glue
ooze out all around:

The solvent in the cyanoacrylate melted the glue on the back of the clear tape, bonding
it to the finish. Additionally, the oozed out cyanoacrylate attacked the finish all
around, but because of the clamping pressure, the glue film was quite thin, so it
didn't melt deeply into the lacquer before it set up.
I sliced most of the tape off with a razor blade.

Some scraping, and a light flat block sanding with 600 grit waterproof paper gave
me a nice flat result.
I mixed up a bit of shellac and lampblack to make a thick "ink." I wanted
an ink that would be resistant to the lacquer I was about to apply over the peghead,
so I chose shellac as a base, because lacquer solvents don't cut shellac. I could
have used India ink, because it's similar to my mixture, but I didn't have any, and
I wanted something a bit thicker, anyway.
With a pointy toothpick I was able to fill in the teeny gaps where the printed lines
were broken around the flake:

Then I gave the peghead face a quick coat of straight retarder thinner to make sure
the new lacquer would "bite" in perfectly.
After a few coats of new clear lacquer, levelling and buffing, the result was quite
remarkable:

You have to look really close to see that it was ever damaged.
I've used this technique on regular flakes of finish and decals where alignment is
a problem. I wish they all came out as well as this job did!
Back to Index Page


