Reattach, don't replace. . . Please
click each small photo to see the big picture.
Regluing Martin Pickguards
© Frank Ford, 2008; Photos by FF
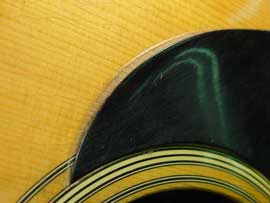
The guitar above is a 1973 Martin D-35 that's generally in good shape for a guitar of its age, but the same can't be said for the pickguard, which has shrunk and curled over the years.
Before about 1985, all Martin pickguards (most Gibsons and Guilds, too) were glued to the unfinished top before the lacquer finish was applied. Solvent was sprayed or brushed to the back of the plastic pickguard, and then the guard was stuck down on the bare wood surface, effectively bonding plastic to wood. As the plastic shrinks with age and heat exposure, it curls up and comes loose, bends the top wood, causes a crack in the top, or a combination of all those effects.
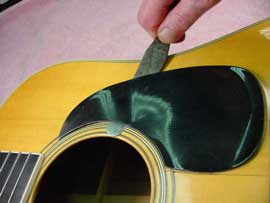
Here, the pickguard has come quite loose around the edges, and caused the top to bend or "cup" downward.
The shrinking pickguard has also brought the wood with it, causing this nasty crack and lifting at its "inboard" margin. Clearly, this pickguard must be reglued or replaced.
You can see the bare unfinished wood underneath. What you can't see, of course, is the underside of the pickguard, with lots of little wood fibers still imbedded in the plastic from the original solvent gluing operation.
I can take advantage of these little attached fibers in my regluing operation. Even if I wanted to, I wouldn't be able to reglue the pickguard using the original solvent gluing technique because the solvent would leak out and destroy the surrounding top finish. Because the pickguard has shrunk a bit from its original size, I'll have to be content with a tiny rough margin around it after my regluing is complete. All in all, I believe that a reglued pickguard is more attractive than an obviously replaced one. The conventional technique of replacing this kind of pickguard involves removing it completely, filling the bare area with finish to make it level with the surrounding finish, and using a modern "self-stick" plastic pickguard on top of the finish. No matter how skillfully that job is done, it still looks like a new pickguard on top of the finish.
OK, here goes. First, I'll carefully loosen the pickguard all around underneath, being careful to leave a tiny bit still glued to the top. Most of the time that bit will be a section over the soundhole rings.
Being plastic themselves, the soundhole rings adhere quite tightly to the plastic pickguard when it is glued with solvent.
Using a couple of clamps to keep from breaking that last little bit loose, I slather regular water based wood glue under the pickguard.
The wood glue will wash safely off the finish, so I don't have to be too careful as I apply it. The glue will stick well to all the fuzzy little wood fibers on the bottom surface of the pickguard, and to the bare wood underneath. If there had been a previous attempt to reglue the pickguard with a sticky glue like contact cement, this technique simply would not work because the wood fibers would be sealed against adhesion by the wood glue.
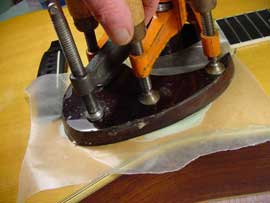
I've made this giant clamping block to support the top underneath the pickguard. It's a bit bigger than the pickguard, and is cut out so it bridges over the top braces which run underneath there.
For distributing pressure on top, I have a pickguard shaped block faced with acrylic plastic. Both blocks are quite flat, and the top block is polished to avoid indenting marks into the pickguard.
With a piece of waxed paper to keep the upper block from sticking, I stack on as many heavy clamps as I can crowd in through the soundhole.
Access is a bit limited, but I wipe up as much squeezed out glue as I can.
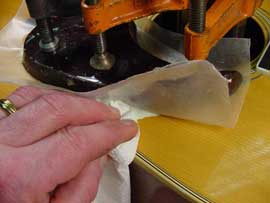
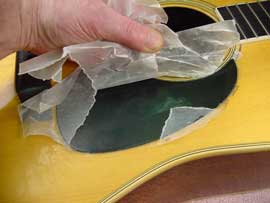
After the glue has dried overnight, I take off the clamps and tear off the waxed paper.
A few spritzes of plain water around the perimeter starts the soaking process to clean up the glue I couldn't reach when the clamps were in place.
As the glue turns whitish, I can wipe it off, and work quickly to clean up very nicely right to the edge of the pickguard without fear of the water loosening my nice new glue joint
Check this out. The top is dead flat now that the pickguard has been reglued. Previous to my gluing efforts the top sagged almost 1/8" in the center of the pickguard
The pickguard makes a strong "skin" to hold the top flat. If I had chosen to replace the guard, I'd have had a lot of trouble flattening the top by reinforcing underneath.
The margin around this particular pickguard is broader than usual because the heat exposure had caused it to shrink more than most.
And, best of all, the crack is tight and level.
All in one relatively simple operation. Not bad. . .

